Table of Contents
Home setup
Equipment
To setup mgl at home you will need the following:
- Mac Computer mgl works only on Apple computers running MacOS, so you can't use it on Windows or Linux machines.
- Second Display while you can run mgl on a machine with one display, this will be a bit hard to debug your code because when your program crashes you will not be able to see the desktop to recover (you typically do a force-quit using option-command-Esc if you are stuck. In some cases, you might have to also hit <ENTER> a couple of times to force quit Matlab). You have two options for displays:
- monitor This is the easiest setup, to have a monitor that you can connect to via HDMI or whatever.
Software
You should make two directories in your home directory, one for code and one for data. You can do this from terminal:
cd ~
mkdir proj
mkdir data
In the proj directory you will want to clone our git repositories.
cd ~/proj
git clone https://github.com/justingardner/mgl.git mgl
git clone https://github.com/justingardner/mrTools.git mrTools
git clone https://github.com/justingardner/gru.git gru
git clone https://github.com/justingardner/grustim.git grustim
Matlab
If you are working in the lab, you can download a license for Matlab - note that you will want to use an older version of Matlab which is more stable. We typically use Matlab R2015a.
For running stimulus programs, I highly recommend running Matlab from a terminal rather than using the Matlab Desktop. While the Matlab Desktop is great for the debugging environment, it tends to be a bit of a problem for stimulus programs when they crash because if the environment crashes then you can't see the error messages. Running from the terminal is easier because if Matlab crashes out the terminal will still have the display of the error messages. To run it, you start Terminal and do:
/Applications/MATLAB_R2015a.app/bin/matlab -nodesktop
Note that if you are using a different version of MATLAB you will need to put that in the command above. You can see what matlab you have by doing:
ls -d /Applications/M*
Once you are running matlab, you will want to make sure to add the paths to our repositories
>> addpath(genpath('~/proj'))
Check the wiki pages for mgl to run the mglSystemCheck and test programs to make sure you have things working properly.
mglEditScreenParams
When working with two displays, you will need to tell mgl how you want to configure your displays. You do this with the command mglEditScreenParams. The point of this command is to keep all the settings that you need for your display. Actually you can keep multiple groups of settings, for example one group of settings for debug and one for actual experiments. Here we will setup one for running experiments. Start by running the command:
>> mglEditScreenParams
You should see a dialog like the following come up:

This allows you to select which configuration to edit. You select that by the number on top. For now, 1 is the one you will edit. If you want to start a new configuration, you would click “Add Display”. Instead, just click OK and you will see a dialog like the following.

- Default settings First, you can try to setup your monitor settings with the default, by unclicking useCustomScreenSettings. If you have a single monitor, then this will take over your main screen. If you have two monitors setup, this will display mgl on the secondary display (i.e. the one that does not have the task bar). Start, by using this and confirming that everything works, later we can customize if you want to use a different screen.
- displayName You will first want to set the displayName which you can set to something that you can remember (probably best to avoid spaces and punctuation). You will use this to refer to these settings later when you call initScreen in your task programs. In the above, you can see that it is set to “external_monitor”.
- Test settings You should now test the settings, by clicking the button “Test screen params” which is on the middle right. This should open up a full screen that looks like the following.
You should be able to see your computer name and the displayName you set above. You can hit Esc and the screen should close. Note that if you do nothing for a few seconds, the screen should close by itself automatically. - Custom monitor/resolution This step is not necessary, if mgl opened up the screen you want in the previous step, If you want instead to open up a different screen with a custom resolution, you can click useCustomScreenSettings and set the screen number and the screenWidth and screenHeight in pixels. For this step, you might want to check the resolution of your monitor. You can do this from the matlab prompt (you will need to click OK to save the current settings / or cancel to not change the settings) with the command mglResolution. For example, to check the resolution of your primary screen you can do
>> mglResolution(1)

ans =

    displayNumber: 1
      numDisplays: 2
      screenWidth: 1920
     screenHeight: 1200
        frameRate: 60
         bitDepth: 32
. Now go back to mglEditScreenParams and set the screenNumber, screenWidth and screenHeight using the values you learned from mglResolution. Click “Test screen params” as above and check that the screen opens up correctly. You might notice that the screen may go blank for a second before coming up - this is MacOS trying to reset the resolution of the display.
- Screen dimensions You will now need to get a tape measure and measure your monitor and your viewing distance. This step is really important because it insures that mgl can show stimuli with the correct size in degrees of visual angle. Measure your display width and height in cm and the distance from where your eyes are to the screen and set these as screenWidth, screenHeight and displayDistance. To check that everything went right, go to “Test screen params” and hit enter after the first screen. You should see something like this
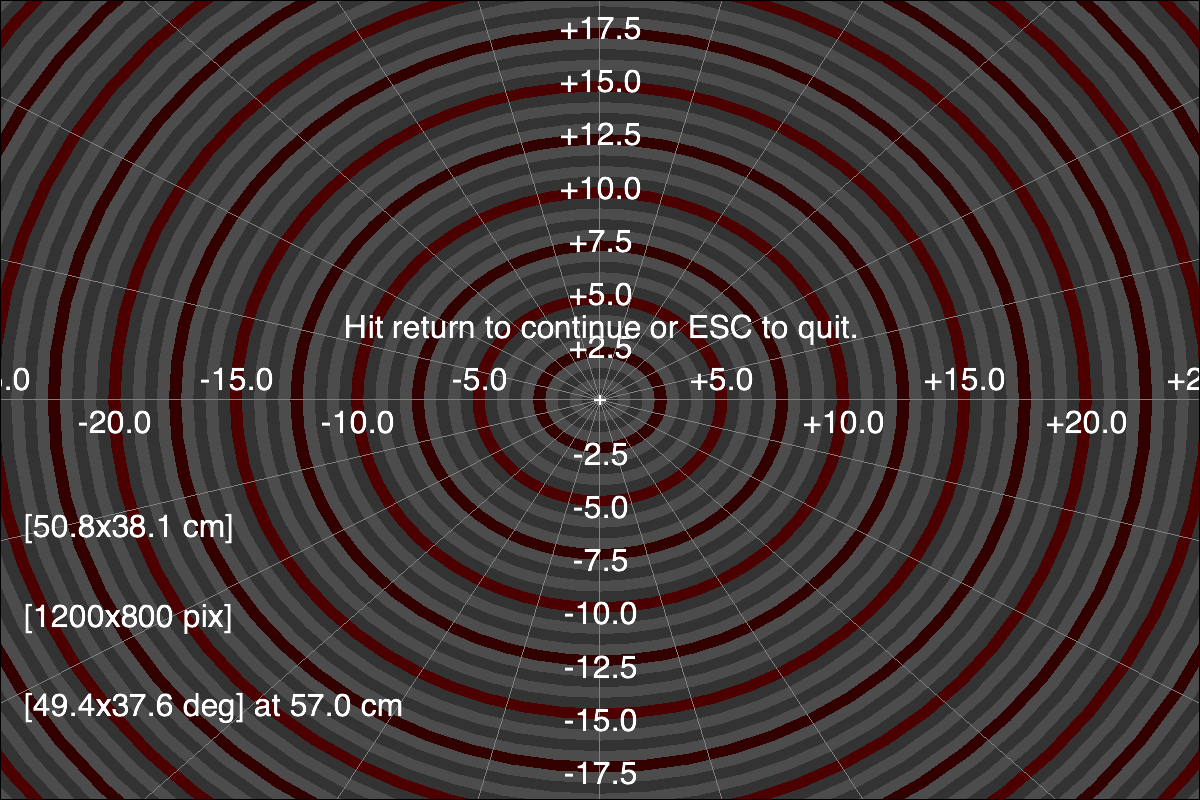
This shows in the bottom left the dimensions in cm of your display, the pixel dimensions and then the degrees of visual angle that the monitor subtends. Recall that degrees of visual angle are defined as the angle from your eyes outward that the stimulus extends. This is an important basic stimulus property for visual neuroscience. If you hold your fist out at arms length, your fist is about 10 degrees of visual angle. Your thumb at the knuckle is about 1.5 degrees of visual angle across. Check to make sure that what is display in the screen is roughly correct (i.e. that from -5 to 5 is about the size of your fist and arms length). Another trick to use is that if you set the displayDistance to 57cm it turns out that 1cm on the screen should be roughly 1 degree of visual angle. - Gamma correction Another really important aspect of showing visual displays is to linearize the luminance output of the monitor. Please read the monitor calibration basics to understand what gamma correction is. For our purposes, we do not have access to a luminance meter at home so we will just set the calibration to correct for the standard Mac display gamma of 1.8. In calibType select “Specify gamma” and in monitorGamma set the value to 1.8. To test things, use “Test screen params” and hit enter to get to the third screen. Note that as you do this, the display should look a little different before, a little brighter and washed-out probably - that's ok, it's what it should like with a linear gamma. You should see the following screen
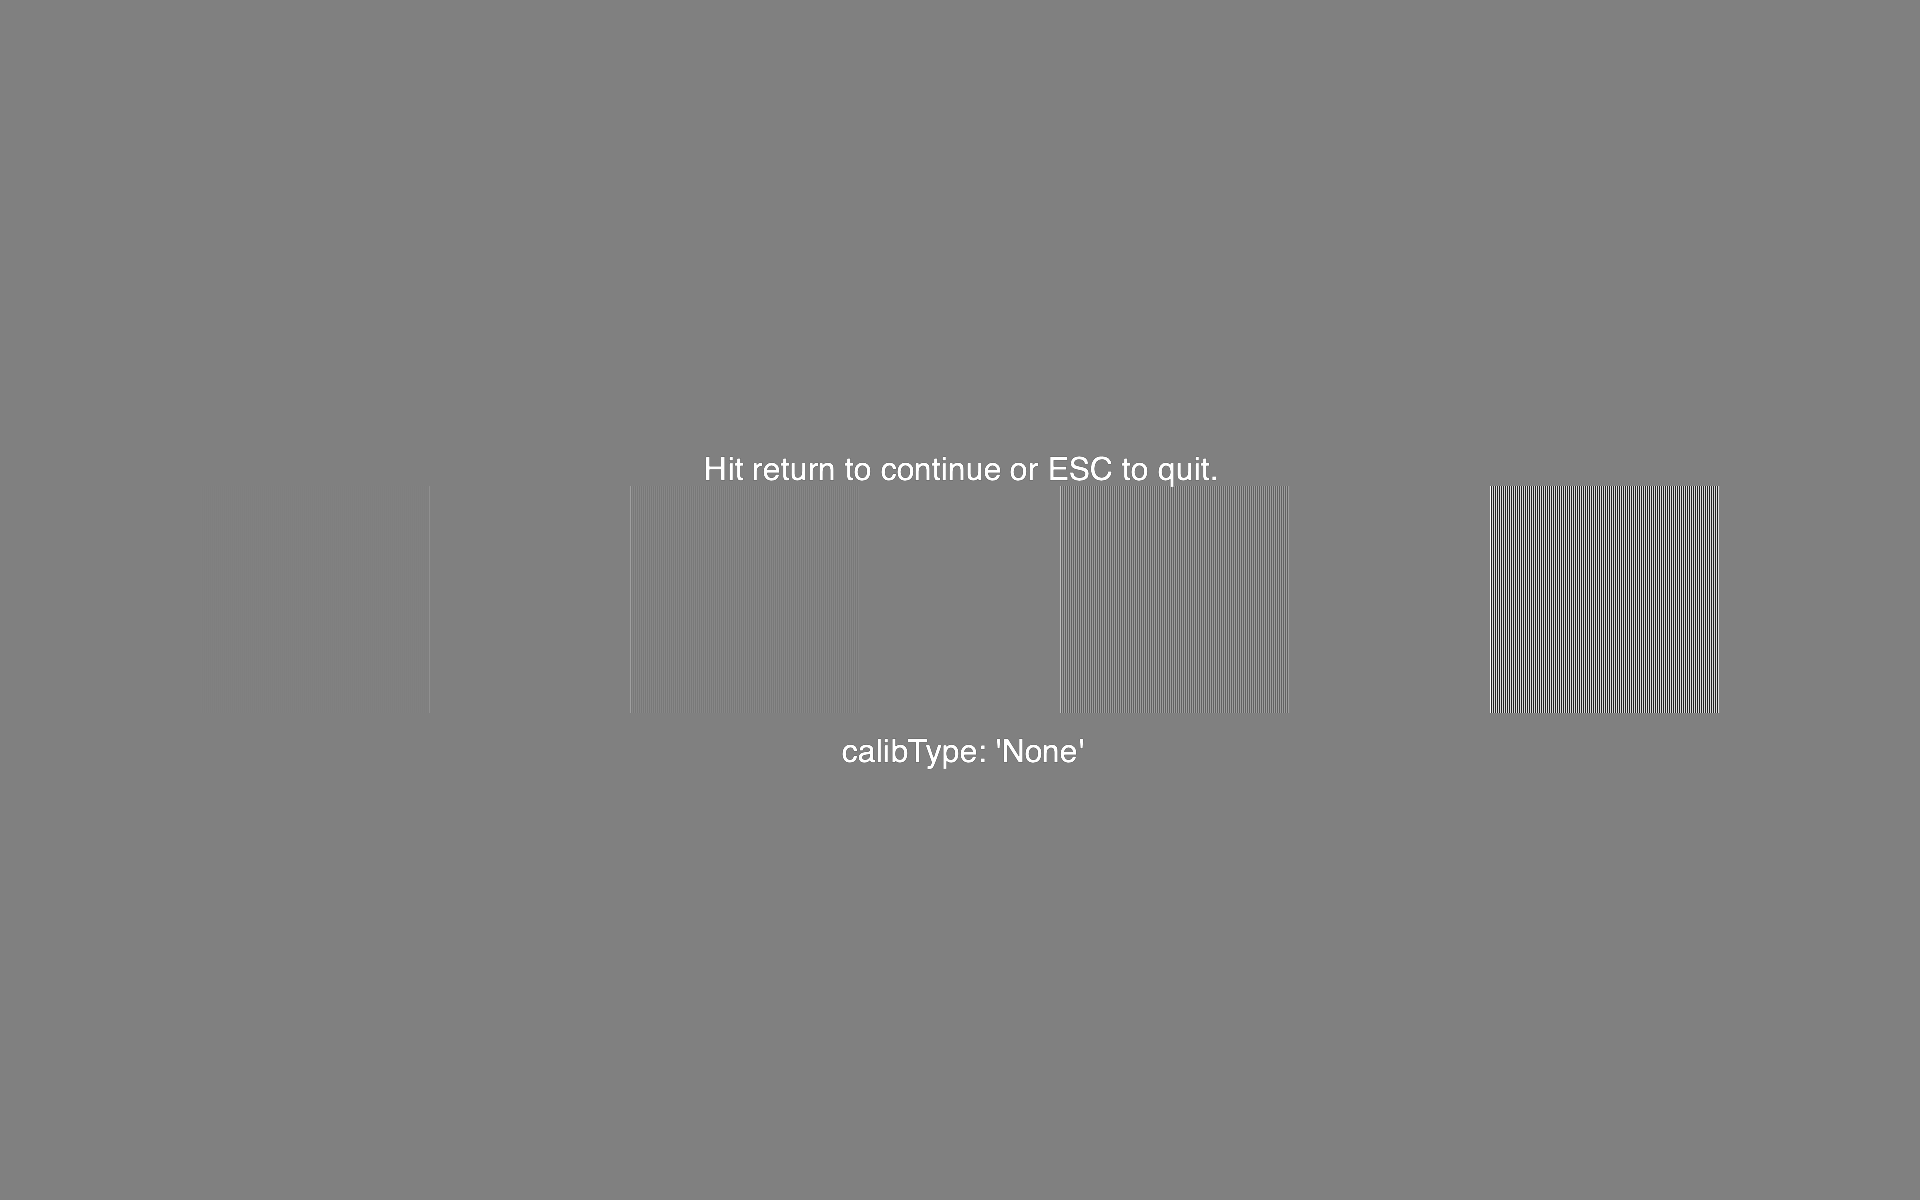
which has drawn on it four boxes that are intended to help you check the gamma visually. The idea is that each box is composed of very fine black and white lines drawn next to each other at different contrasts (i.e. difference between black and white). If you can't see the lines themselves then your eyes is blurring together the lines and you should see the average luminance. If the monitor is exactly linearized, then the average luminance should be gray (i.e. between black and white), and the boxes should not (or barely) be visible. Going from left to right the boxes have higher contrast and any problem with linearization will show up more on the boxes in the right. In practice, I can usually see the boxes as being a little different luminance from the gray background. That's ok. And for a home setup, the discrepancy will be even worse. - saveData You will also want to set the saveData setting. This tells mgl whether to always save a stimfile or not. For debugging, you might want to set to -1 so that it asks you each time (because otherwise you will have a lot of stifles without any data lying around) or set to 0 to never save a stimfile (note that stifles will still be created, they will just be thrown into the trash). If you are running experiments, then set it to 1 so that it always saves a stimfile.
- help Now is probably a good time to let you know about help. If you click the “Show Help” button it will bring up a gigantic figure which gives you help information about each one of the settings that you can change. Please check here for how to set other settings. Note that if you can't see things clearly in the dialog box, you can always close it and look at what is printed in the Matlab Desktop which will show you the same information.
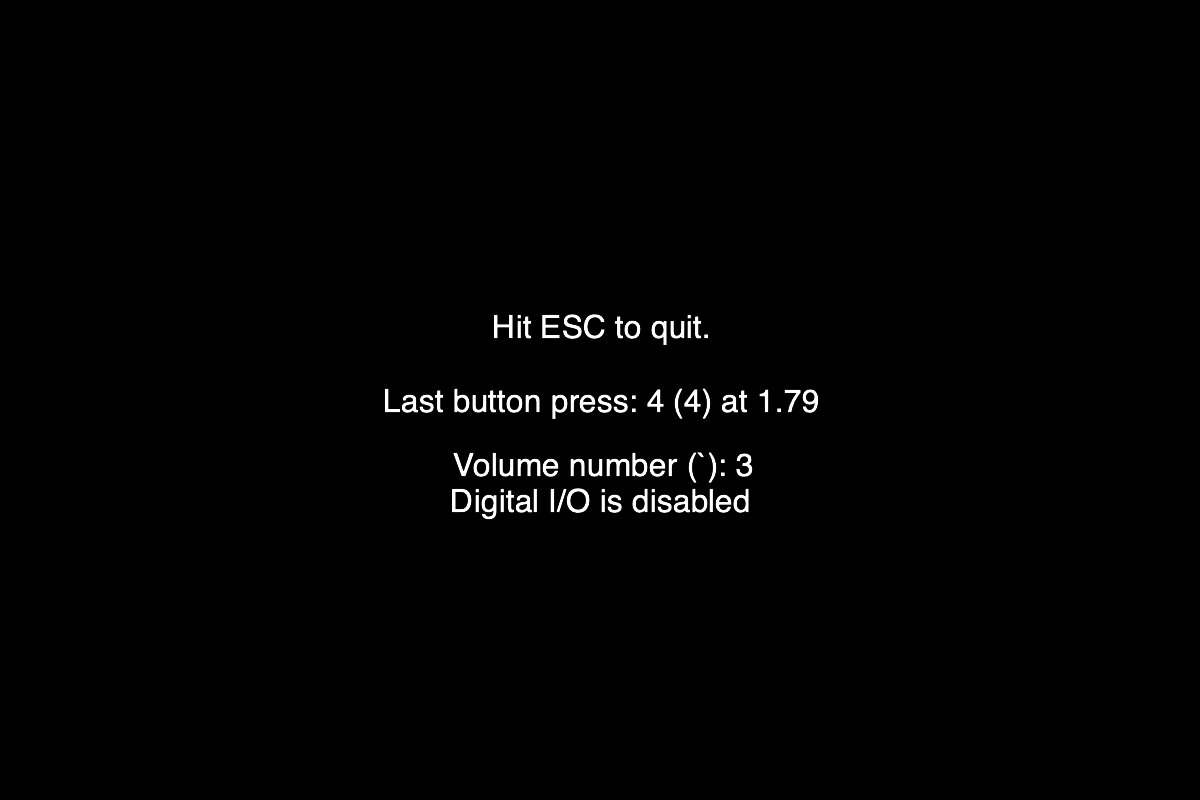
- response keys Typically you will not need to change these, but if you want to use different keys for subject responses (e.g. a and s instead of 1 and 2), you can put these into responseKeys which is a list in order of what key corresponds to what subject response. You can also set the backtickChar which is the key that we usually use to start an experiment. To check the settings go to “Test screen params” and go to the fourth and final screen, pressing the response keys you set should register like the following:
- mglSetSID Typically in the lab we keep all personal identifiers separate from the data as this is required by our IRB protocol. We do this by keeping a separate password protected file that links a subject ID number (s001 for example) with the subject's name, date of birth, ethnicity and race information (required by NIH). Check the mglSetSID documentation for more information. In mglEditScreenParams, you can see how things are set. In particularly, you will want to make sure that you have “mustSetSID” set so that it requires setting of SID when running an experiment (you can use “test” if you are debugging). You should also change the location that the sid database is saved in. I recommend putting in your home directory (for me this is /Users/Justin - change this to your own username), so change sidDatabaseFilename to “/Users/Justin/.sidDatabase” and log path to “/Users/Justin/.mgllogpath”, making sure to change Justin to your own username.
- save settings Click OK to save settings. If you hit cancel then settings will not be changed and revert to what was in there before.
- test initScreen We use the settings whenever we open up a screen using initScreen in our task programs. You can test that from the matlab prompt, by running initScreen('displayName') where displayName should be replaced by whatever you used above for your displayName. You will first need to set an SID, you can use test
mglSetSID('test');You may wish to run initScreen with the following all in one line, which will open up the screen, change the background color, wait 10 secs and then close the screen (just in case something went wrong and it covers up your matlab workspace, this will auto close) Note that you will need to change 'external_monitor' to whatever you used for your displayName
initScreen('external_monitor'); mglClearScreen([0.3 0.7 0.4]); mglFlush; mglWaitSecs(10); endScreen;If all went well, you should see in the command buffer something like the following
=+=+=+=+=+=+=+=+=+=+=+=+=+=+=+=+=+=+=+=+ Begin initScreen =+=+=+=+=+=+=+=+=+=+=+=+=+=+=+=+=+=+=+=+
(initScreen) SID is: test
(initScreen) Monitor parameters for: boodles displayName: external_monitor
(initScreen) ignoreInitialVols = 0
(initScreen) 1.0: 1920x1200(pix) dist:57.0 (cm) size:51.7x32.0 (cm) 60Hz save:1 autoclose:1 flipHV:[0 1]
(initScreen) Saving data into ~/data
(mglPrivateVolume) Volume property does not exist
(initScreen) Flipping coordinates vertically
(initScreen) Correcting for monitor gamma of 1.80
(initScreen) imageWidth: 50.23 imageHeight: 31.74
(mglPrivateListener) Starting keyboard and mouse event tap. End with mglListener('quit').
=+=+=+=+=+=+=+=+=+=+=+=+=+=+=+=+=+=+=+=+ End initScreen =+=+=+=+=+=+=+=+=+=+=+=+=+=+=+=+=+=+=+=+
(endScreen) No myscreen variable passed in, just closing screen and shutting down listeners
(mglPrivateListener) Ending keyboard and mouse event tap
I really, really encourage you to always glance at this display when it comes up. It tells you whether important settings have been set when you open the screen. In particular, the imageWidth/imageHeight (in degrees of visual angle), where data is being saved to, what the monitor calibration is that is being used.
- mglSetSID You should add yourself as a subject in you local sid database, so that later all of the data gets stored in a subjectID specific way. To do so, run
mglSetSID('add');The first time you run, you will see the following
(mglSetSID) Setting lock file on SID database
(mglSetSID) Could not find SID Database file /Users/justin/.sidDatabase, create one from scratch? (y/n)?
since you do not yet have an SID database. Go ahead and say “y”. You should see a dialog like the follwing
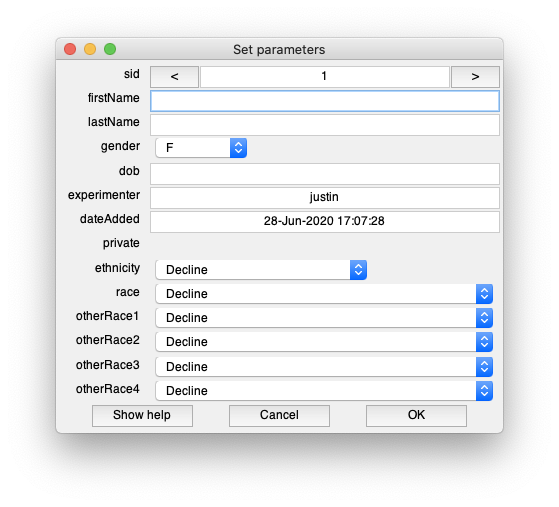
Go ahead and put in your name, gender, date of birth and click OK. You will now see(mglSetSID) Create SID database file: /Users/justin/.sidDatabase (y/n)? y (mglSetSID) Saving SID database, enter password enter des-ede3-cbc encryption password: Verifying - enter des-ede3-cbc encryption password: (mglSetSID) Releasing lock file on SID database
You can enter whatever password you want here - just make sure it is something you remember. To test whether it works or not, you can try to set your SID using your name
>> mglSetSID('justin')
(mglSetSID) Loading SID database, enter password
enter des-ede3-cbc decryption password:
(mglSetSID) Found subject: Justin Gardner (s001)
(mglSetSID) Setting SID: s001
You will need to use the password that you set on the sid database.
- You're done If you got this all going, then you should be ready to go running experiments at home. Phew! In any task code that you might have, make sure that initScreen is being called with the correct displayName that you are using.


